Meshtastic and MeshCore Pros & Cons

Meshtastic and MeshCore are both open-source, off-grid mesh network firmware for LoRa radios that use similar hardware but differ significantly in their networking approach, features, and community maturity. Meshtastic is known for its widespread adoption and broad features, while MeshCore offers a more stable and reliable experience, particularly for messaging.

Comparison as of below: –

Feature Meshtastic MeshCore
Routing Uses a flooding protocol, where messages are rebroadcast by all clients and repeaters. Recent updates added some smart routing, but its primary mechanism is still flooding. Uses defined, static paths through repeaters for most traffic, with flooding used only as a fallback. Can be manually configured to optimize routes.
Message Reliability Can be less reliable, particularly in complex or high-density areas, due to “packet collisions” and inefficient flooding. Delivery confirmations are less precise. Offers significantly more reliable message delivery because clients do not rebroadcast messages by default, reducing network traffic and collisions.
Network Scaling Can experience performance issues in large, dense city networks as network traffic increases with every new node flooding messages. Scales more efficiently in larger, more complex environments by relying on fixed repeaters for routing instead of flooding.
Hop Limit Has a lower hop limit (typically 7). Has a significantly higher hop limit (64 hops) for much greater range potential.
Ecosystem & Features Offers more advanced features, including optional GPS telemetry broadcast, ATAK integration, and MQTT for internet backhaul. Supports a wider range of hardware devices. Has fewer features outside of core messaging. Focuses on the core task of reliable, off-grid communication and has deliberately chosen not to include features like MQTT.
Community & Adoption Possesses a larger and more established user base globally. Easier to find and connect with an existing network in populated areas. Has a smaller, but growing, community. Adoption is concentrated in specific regional pockets.
Development Continues to develop and add new routing features to improve performance. Is praised for its stable, cleaner firmware and more consistent cross-platform app experience.

Meshtastic vs Meshcore?

MeshCore is way more stable and reliable. The firmware is simpler and makes more sense. Also, the app is a lot less buggy and more standard across platforms.

The functionality of MeshCore is night and day better than MT in terms of tooling and reliable comms


Which one should you choose?

Your ideal choice depends on your primary use case:

Choose Meshtastic if you want:

  • Ease of getting started: The large, existing user base means it’s often plug-and-play to find others in your area.
  • Broad feature support: It’s the better choice if you need features like GPS tracking, telemetry, or MQTT integration for internet backhaul.
  • A “moveable” network: It is better suited for small, temporary groups in remote areas (like hiking or camping) where everyone moves together.

Choose MeshCore if you want:

  • Reliable, point-to-point messaging: Its intelligent routing is superior for ensuring message delivery in dense environments or over complex terrain.
  • A stable, scalable network: It is better suited for creating a permanent, large-scale network with fixed repeater nodes, like a city-wide mesh.
  • Less radio congestion: By default, clients don’t flood the network, making it “quieter” on the airwaves.


How to meshtastic latest firmware “smart routing” works

Meshtastic’s “smart routing” combines a “Managed Flooding” protocol for broadcast messages with a new, more direct “Next-Hop Routing” method for targeted, direct messages, starting in firmware version 2.6

. The system adapts dynamically to network changes while keeping airtime usage low, especially for unicast messages.

Smart routing for broadcast messages

For general messages intended for all nodes on a channel (broadcasts), Meshtastic uses a sophisticated method called “Managed Flood Routing”. It’s a key reason why the Meshtastic network is so resilient and adapts to dynamic conditions.

  1. Wait and listen: When a node receives a broadcast packet, it doesn’t immediately re-transmit it. Instead, it waits a short, calculated amount of time before re-broadcasting.
  2. Delay based on signal strength: The length of this waiting period is based on the Signal-to-Noise Ratio (SNR) of the incoming packet.
    • Nodes with a poor SNR (farther away) have a shorter waiting time.
    • Nodes with a strong SNR (closer) have a longer waiting time.
  1. Preventing redundant re-broadcasts: If a node hears another node re-broadcasting the same packet during its waiting period, it will cancel its own re-broadcast. Because farther nodes are prioritized, this ensures that the message is relayed by the node that can extend the message farthest, preventing redundant broadcasts from close-by nodes.
  2. Special roles for routers: Dedicated router or repeater nodes are an exception, as they have a higher priority and re-broadcast messages faster to ensure consistent coverage from fixed, high-visibility locations.

Smart routing for direct (unicast) messages

To make one-on-one communication more efficient, Meshtastic firmware version 2.6 introduced “Next-Hop Routing” for unicast messages. This method uses managed flooding initially but then remembers the best path.

  1. Initial flooding: The first time a node sends a direct message to another, the network uses the managed flooding protocol to find a path to the destination.
  2. Next-hop path discovery: When the destination node replies, the transmitting node remembers which node or “next-hop” was used to relay the packet successfully.
  3. Optimized direct transmission: For subsequent messages, the transmitting node will send the packet directly to the identified next-hop, rather than flooding the entire network. This is more efficient and conserves airtime.
  4. Automatic fallback: If RF conditions change and the next-hop node does not successfully relay the message, the network automatically falls back to the more robust managed flooding to re-discover a new optimal path.

Benefits of Meshtastic’s smart routing

  • Adaptability: The network can handle constant changes in topology, such as nodes moving around, without needing to maintain complex routing tables.
  • Efficiency: For most traffic (broadcasts), the system prioritizes transmission by the nodes that offer the best range extension. For direct messages, it remembers proven routes to reduce network chatter.
  • Scalability: By avoiding complex routing tables and managing flood traffic, Meshtastic is designed to scale well, even in dense network environments.
  • Minimal overhead: It keeps the routing logic simple and distributed, allowing it to run efficiently on low-power, resource-constrained devices.


Meshtastic Smart Routing Diagrams

Managed Flood (Broadcast)


Next-Hop Discovery (First Unicast)

Optimized Direct Routing (Subsequent Unicast)

MeshCore Static Routing Diagrams

Static Routing (Unicast Path)

Static Routing (Failure, No Auto Reroute)

Static Routing (Policy-Controlled Broadcast)

Static Routing (Primary/Backup Paths)

Download full document in PDF here

AMBEserver.c Mod

https://raw.githubusercontent.com/lwkoon/AMBEserver2/refs/heads/main/AMBEserver.c

Above is one way to modify the code in the UDP processing function so that a corrupted packet (for example, one with an invalid payload length) is simply dropped rather than forwarded to the AMBE3000. In the updated version of the processSocket() function, we check that the payload length (after converting from network byte order) does not exceed the size of the payload buffer. If it does, we print an error message and ignore the packet.

Explanation Start Byte Check: The code first confirms that the packet begins with the expected start byte (0x61). If not, it logs the error and skips processing.

Payload Length Validation: After converting the payload length from network byte order, we compare it against the maximum size of the payload union. This prevents a corrupted packet (for example, one where the payload length is much larger than expected) from causing a buffer overflow or an erroneous behavior.

Packet Size Verification: The function then computes the expected size of the packet and ensures the received packet exactly matches this size.

Safe Forwarding: Only after these checks is the packet forwarded to the AMBE3000 over the serial interface.

This approach should help prevent crashes or lock-ups of the AMBE3000 due to bad internet packets.

Shell script to getMalaysia weather (API) from met.gov.my and use it with tts_audio.sh (hamvoip allstarlink)

#! /usr/bin/perl
use warnings;
use LWP::UserAgent;
use HTTP::Request;
use HTTP::Response;
use JSON;
use JSON::Parse ':all';
use Data::Dumper;
use Time::Piece ();
use feature qw( :all );
my $now = Time::Piece::localtime->strftime('%Y-%m-%d');
my $time = Time::Piece::localtime->strftime('%I:%M %P');
my $ua = LWP::UserAgent->new;
my $json = JSON->new->utf8->allow_nonref;
my $req = HTTP::Request->new(GET => 'https://api.met.gov.my/v2/data?datasetid=FORECAST&datacategoryid=GENERAL&locationid=LOCATION:300&start_date='. $now. '&end_date=' . $now);

my $filename = '/tmp/hello.txt';

$req->content_type('application/json');
$ua->ssl_opts(SSL_verify_mode => 0); #Used to ignore certificate
$ua->default_header('Authorization' => "METToken xxxxxxxxxxxxxxxxxxxxxxxxxxxxxxxxxxx");
my $response = $ua->request($req);
#my $json = decode_json($response);
if ($response->is_success) {
    #print Dumper($response->content());
    my $perlData = $json->decode($response->content());
    #my $result = Dumper($perlData);
    my $locationname=$perlData->{results}->[5]->{locationname};
    my $tempmaxunit=$perlData->{results}->[4]->{attributes}->{unit};
    my $tempmax=$perlData->{results}->[4]->{value};
    my $tempminunit=$perlData->{results}->[3]->{attributes}->{unit};
    my $tempmin=$perlData->{results}->[3]->{value};
    my $value=$perlData->{results}->[5]->{value};
    my $when=$perlData->{results}->[5]->{attributes}->{when};
    my $code=$perlData->{results}->[5]->{attributes}->{code};
    #my $str = "The time is, " . $time . " , and the location is at " . $locationname . ", today minimum temperature is at " . $tempmin . " degree " . $tempminunit . " and today maximum temperature is at " . $tempmax . " degree " . $tempmaxunit . " and as a result, today will be, " . $value . " , and , " . $when . " , " . $code . "\n";
    my $str = "The time is, " . $time . " , and the location is at " . "Sue-bung- Jar-ya-" . ", today minimum temperature is at " . $tempmin . " degree " . $tempminunit . " and today maximum temperature is at " . $tempmax . " degree " . $tempmaxunit . " and as a result, today will be, " . $value . " , and , " . $when . " , " . $code . " ..........\n";
    open(FH, '>', $filename) or die $!;
    print FH $str;
    close(FH);
    print "Writing to file successfully!\n";
    #print "Location is at " . $locationname . ", " . "today will be " . $value . " and " . $when . " " . $code . "\n";
}
else{
    print " inside failed block\n";
}

crontab your weather script in hello.txt and generate your audio via tts_audio.sh

/root/scripts/getapimetgovmy.pl && cd /tmp && tts_audio.sh /tmp/hello.txt && /usr/bin/asterisk -rx “rpt localplay 47259 /tmp/hello”

Shell script to update flatfile DMRId.dat to MySQL Database

Add below crontab :-

20 3 * * * /usr/bin/curl --fail -o /tmp/DMRIds.dat -s http://www.pistar.uk/downloads/DMRIds.dat > /dev/null 2>&1

/path/update_newestdmrid_datfromtmp.sh :-

#!/bin/bash
/usr/bin/mysql --user=dbuser --password='password' -e "source /path/update_newestdmrid_datfromtmp.sql"

/path/update_newestdmrid_datfromtmp.sql :-

USE table;

CREATE TABLE IF NOT EXISTS temp_table SELECT ccs7, callsign, name FROM table LIMIT 0;

CREATE INDEX ccs7 on temp_table (ccs7) USING BTREE;
CREATE INDEX callsign on temp_table (callsign) USING BTREE;
CREATE INDEX name on temp_table (name) USING BTREE;

LOAD DATA LOCAL INFILE '/tmp/DMRIds.dat'
INTO TABLE temp_table
FIELDS TERMINATED BY '\t';

INSERT INTO table
(ccs7, callsign, name)
SELECT t1.ccs7, t1.callsign, t1.name FROM temp_table t1
WHERE NOT EXISTS(SELECT ccs7 FROM table t2
WHERE t2.ccs7 = t1.ccs7 and t2.callsign = t1.callsign);

DROP TABLE temp_table;

***remark your dbuser,password,table & temp_table to your db/user and table in MySQL database

Perl script to grab info from qrz.com or radioid.net

#!/usr/bin/perl

# Use the DBI module
#use strict;
use DBI;
#use warnings;
#use LWP::Simple;
use JSON::XS qw( decode_json );
use Data::Dumper;
use String::Util qw(trim);
use LWP::Simple qw(get);
use LWP::UserAgent;

#qrz api
use Ham::Reference::QRZ;
use Data::Dumper;


my $ua = LWP::UserAgent->new();
$ua->agent('Mozilla/5.0 (Windows NT 6.1; Win64; x64) AppleWebKit/537.36 (KHTML, like Gecko) Chrome/74.0.3729.169 Safari/537.36');
# PERL SQL Update Example
# my $callsign = uc("9W2LWK");
sub ucwords
{
my $str = shift;
$str = lc($str);
$str =~ s/\b(\w)/\u$1/g;
return $str;
}

print "Enter callsign please: ";
my $callsign = <STDIN>;
chomp $callsign;
$callsign = uc(trim($callsign));
print "\n";
print "Please enter first name first or last name first: (0=firstnamefirst/1=lastnamefirst): ";
my $flchoice = <STDIN>;
chomp $flchoice;
$flchoice = trim($flchoice);

#-------------------------------------
# qrz.com api
#-------------------------------------

my $qrz = Ham::Reference::QRZ->new(
callsign => $callsign,
username => '9w2lwk',
password => 'xxxxxxx'
);

my $listing = $qrz->get_listing;
my $dxcc = $qrz->get_dxcc;
my $session = $qrz->get_session;

$qrz->set_callsign('9W4GWK');
#debug
print "QRZ.com Surname and lastname\n";
#print Dumper($listing);
#print Dumper($dxcc);
#print Dumper($session);
#end-debug

print "Name: $listing->{name}\n";
print "Last Name: $listing->{fname}\n";

my $fname2 = $listing->{fname};
my $name2 = $listing->{name};
#--------------------------------------
# end of qrz.com api
#--------------------------------------

#my $url = 'http://www.radioid.net/api/dmr/user/?callsign=ON2RVQ';
my $url = 'https://radioid.net/api/dmr/user/?callsign='.$callsign;
my $response = $ua->get($url);
my $content = $response->content;
#my $content = get($url);
#print $content;
die "Couldn't get $url" unless defined $content;
my $json_array = decode_json($content);
my $dsn = 'DBI:mysql:database=databasename;host=localhost';
my $db_user_name = 'dbuser';
my $db_password = 'dbpassword';
my $password = "dbpassword";

print "\n";
print "This is the contents from radioio.net : -"."\n";
print "\n";

print $content;
print "\n";
print "\n";

my $fname = $json_array->{results}->[0]->{fname};
my $surname = $json_array->{results}->[0]->{surname};
my $country = $json_array->{results}->[0]->{country};
my $state = $json_array->{results}->[0]->{state};

print "fname count:-\n";
print $fname2 =~ s/[FT]//g;
print "\n";

if (!defined $fname2)
{
print "not change";
}
else
{
$fname = $fname2;
$surname = $name2;
}

if ($flchoice eq '0')
{
$fullname = ucwords(ucwords(lc($fname)) . " " . ucwords(lc($surname)));
#my $fullname = $fname . $surname;
print "First Name = " . $fname ."\n";
print "Surname = " . $surname ."\n";
print "Full Name = " . $fullname ."\n";
}
elsif ($flchoice eq '1')
{
$fullname = ucwords(ucwords(lc($surname)) . " " . ucwords(lc($fname)));
print "First Name = " . $fname ."\n";
print "Surname = " . $surname ."\n";
print "Full Name = " . $fullname ."\n";
}
else
{
$fullname = ucwords(ucwords(lc($fname)) . " " . ucwords(lc($surname)));
print "First Name = " . $fname ."\n";
print "Surname = " . $surname ."\n";
print "Full Name = " . $fullname ."\n";
}


#print Dumper($json_array);

# Connect to the database
# Note this connection can be used to
# execute more than one statement
# on any number of tables in the database
if ($callsign eq '')
{
print "Input cannot be blank"."\n";
}
else
{
my $dbh = DBI->connect($dsn, $db_user_name, $db_password) or die "Unable to connect: $DBI::errstr\n" ;
print "Select the record out first"."\n";
my $stmt2 = "SELECT * FROM dmrid where callsign = " . "'" . trim("$callsign") . "'";
print "\n";
print $stmt2."\n";
my $sth2 = $dbh->prepare($stmt2) or die "Unable to connect: $DBI::errstr\n" ;
$sth2->execute();

my ($count) = $sth2->fetchrow_array;
if ($count == 0) {
print "NO rows fetched!\n";
#$sth2->finish();
#$dbh->disconnect();
}
else
{
print "Record found!\n";
my $dbh = DBI->connect($dsn, $db_user_name, $db_password) or die "Unable to connect: $DBI::errstr\n" ;

# Create the statement.
#print $flchoice ."\n";
print "debug: Full Name = " . $fullname ."\n";

my $fullname_ = trim($fullname);
my $stmt = "UPDATE dmrid SET name = " . $dbh->quote("$fullname_") . "," . "country = " . $dbh->quote("$country") . "," . "state = " . $dbh->quote("$state") . " WHERE callsign = " . $dbh->quote("$callsign") ;
print "\n";
print "\n";
print $stmt."\n";
# Prepare and execute the SQL query

my $sth = $dbh->prepare($stmt) or die "Unable to connect: $DBI::errstr\n" ;

# Execute the statement
$sth->execute();

$sth->finish();
$dbh->disconnect();
}

}

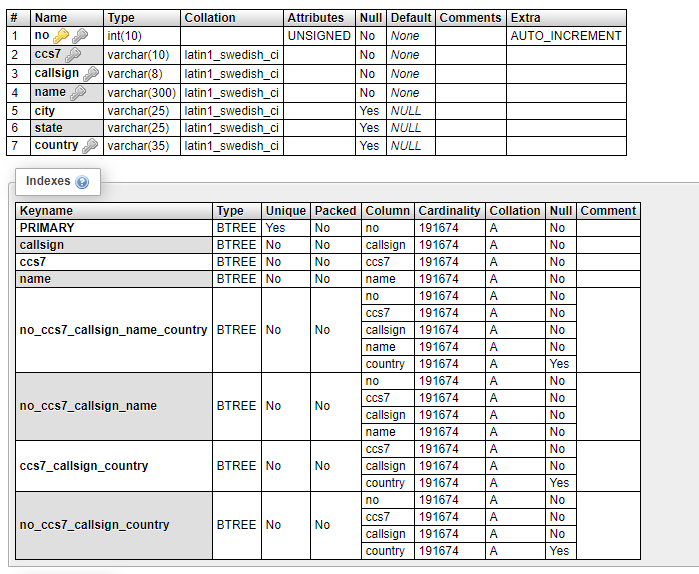
table structure:-

dmrid.table

SMS functions via DMR

Original post and credit to : Ronald PE2KMV https://www.pe2kmv.nl/wp/en/dmr-en/sms-functions-via-dmr/

The Brandmeister network has some functions to request information via SMS messages. To access these functions specific keywords are to be sent to DMR ID 262993. Then the system responds as well via SMS on these requests. Below you’ll find an overview of these commands with some explanation. The commands are not case sensitive.


Furthermore it’s possible to route DMR messages into the DAPNet pager network. More information regarding DAPNet can be found at the website of Dutch Amateur Pagernetwork and  RWTH Aachen (Aachen University). Messages for DAPNet are to be sent to DMR ID 262994.

A pager message for DAPNet is to be sent in the format [callsign] [message], for instance PX0XXX This is a message from DMR to DAPNet . This sends a messagetext ‘This is a message from DMR to DAPNet’ to user PX0XXX . Prerequisite is that ‘PX0XXX’ is a registered DAPNet user.

Build a P25/DMR Cross-Mode Bridge

Quoted from https://blog.927.org/node/1, credit to the admin of the original page
This tutorial will serve as a BASIC guide to building your own cross-mode bridge from P25 to/from a Brandmeister DMR talk group. This tutorial is based on a Raspberry Pi 3B+ hardware, however it should be very similar on Ubuntu 18.04 or other current flavors of Linux. 

Software packages include: DVSwitch from N4IRS: https://github.com/DVSwitch and the P25 Client software from G4KLX at https://github.com/g4klx/P25Clients

If you’re not comfortable with compiling source code, setting file permissions, or modifying firewalls/port-forwarding – Google for these things! There is plenty of help available for your specific software and hardware…

Terminal commands are in Italics, and must be run one line at a time…

OVERVIEW

You'll be installing and configuring several software components that all play together to transcode a DMR data stream to P25 and vice-versa using DVSwitch The DVSwitch packages support other modes as well (NXDN, YaesuFusion, D-Star), and while this document does not cover them, they do not seem wildly different from what we're doing here.

So - let's get on with it!

ARCHITECTURE

P25Reflector<->P25Gateway<->AnalogBridgeP25<->AnalogBridgeDMR<->MMDVMHost<->BM Master

BUILD

We are going to build from the P25 side to the Brandmeister side. The first component is the P25 Reflector. First, download the P25Clients source code from G4KLX from https://github.com/g4klx/P25Client. 

BUILD THE REFLECTOR:

With the method of your choice, download and extract the client software to its default path (P25Clients-master) in /Downloads, and from there. Open a terminal window and.

cd /P25Clients-master/P25Reflector
ls -la


Confirm that you have source files, and they're in the right place: there should be a “P25Reflector.cpp” in this folder.

Copy the ini file to its new home:

sudo cp P25Reflector.ini /etc

Tweak the .ini file - Change “Daemon=1” to “Daemon=0”

sudo vi /etc/P25Reflector.ini

Save and Exit the editor.

Compile (Make sure you’re in ~/Downloads/P25Clients-master/P25Reflector)

make

Copy the compiled executable file and script to their new location: 

sudo cp p25Reflector /usr/local/bin/

sudo cp P25Reflector.sh /usr/local/bin/

sudo chmod +x /usr/local/bin/P25Reflector.sh

Test it!

cd /usr/local/bin
sudo ./P25Reflector.sh start /etc/P25Reflector.ini &


On first run, you should see something like this (ignore the DMRIds.data error)

P25R Start

Leave this terminal window open for now... it should show repeating "No Repeaters Linked" messages... 

BUILD THE P25GATEWAY:

P25Gateway creation is very similar to the P25Reflector. Open a new terminal window and:

cd /P25Clients-master/P25Gateway
ls -la


Confirm that you have source files, and they're in the right place: there should be a “P25Gateway.cpp” in this folder.

Copy the ini and P25Hosts file to their new home:

sudo cp P25Hosts.txt /etc

sudo cp P25Gateway.ini /etc

Compile:

make

Copy the P25Gateway to its new location: 

cp P25Gateway /opt/P25Gateway/

INSTALL DVSWITCH COMPONENTS:

Steve, N4IRS has made installing and configuring his tools very easy. Follow his instructions for adding the software repository and install the Analog Bridge and the MMDVM_Bridge using his instructions at https://dvswitch.groups.io/g/main/message/1224

The 'short version' from Steve's notes: 

cd /tmp
wget http://dvswitch.org/install-dvswitch-repo
chmod +x install-dvswitch-repo
./install-dvswitch-repo
 apt-get update


Install:

sudo apt-get install dvswitch

You should now have a P25Gateway, Analog_Bridge, md380-emu and MMDVM_Bridge folder in /opt - confirm that: 

ls -la /opt

Copy the MMDVM_Bridge.ini to /etc

cp /opt/MMDVM_Bridge.ini /etc

Understanding the next few steps are critical - you'll recall from the Architecture section that 2 instances of Analog_Bridge are needed. We are going to create those and their associated .ini files now.

cd /opt/Analog_Bridge
cp Analog_Bridge Analog_Bridge_p25
cp Analog_Bridge.ini /etc/Analog_Bridge_p25.ini
cp Analog_Bridge Analog_Bridge_DMR
cp Analog_Bridge.ini /etc/Analog_Bridge_DMR.ini


<STOP> TEST POINT B1

You should now have all of the software installed. Let's make sure the ini files that were copied to new folders have landed where we intended. The following files should be in your /etc folder (there will be others - including other .ini files...)

List the .ini files in /etc: 

ls -la /etc|grep .ini
  • P25Reflector.ini
  • P25Gateway.ini
  • Analog_Bridge_DMR.ini
  • Analog_Bridge_P25.ini
  • MMDVM_Bridge.ini
Should all be there... 

Likewise, the following FILES should be in these locations: 
  • /usr/local.bin/P25Reflector/P25Reflector.sh
  • /usr/local.bin/P25Reflector/P25Reflector
  • /opt/Analog_Bridge/Analog_Bridge_DMR
  • /opt/Analog_Bridge/Analog_Bridge_P25
  • /opt/MMDVM_Bridge/MMDVM_Bridge

CONFIGURE

There's no nice way to say this - the following section will require tedious, exacting, precise trial and error. :) The various components installed need to communicate with each other and do so via a collection of ports and everything needs to line up. It can be tricky. Remember we're working from P25 to DMR, and will 'follow the data' through each step. Thankfully, Steve N4IRS makes this as easy as possible - but it does require some very precise changes. You may have noticed during installation that we copied all of the .ini files to /etc - make sure you're editing these, and not the original files from /opt or /usr/local/bin. Worst case, if an edit goes bad you can always copy the default version back into /etc and start again. P25Reflector.ini needs very little tweaking, and we did that at install. (Changed Daemon from "1" to "0"). 

CREATE LOG DIRECTORIES

sudo mkdir /var/log/P25Gateway
sudo mkdir /var/log/P25Reflectorcp
sudo mkdir /var/log/mmdvm


P25GATEWAY

 sudo vi /etc/P25Gateway.ini

[General]
Callsign={Your callsign here}
RptAddress=127.0.0.1
RptPort=32010
LocalPort=42020
Announcements=1
Daemon=0 <--CHANGE "0"

[Id Lookup]
Name=DMRIds.dat
Time=24

[Log]
FilePath=/var/log/P25Gateway/
FileRoot=P25Gateway

[Network]
Port=42010
HostsFile1=/opt/P25Hosts.txt <--CHANGE to /etc/P25Hosts.txt
HostsFile2=./private/P25Hosts.txt
ReloadTime=60
ParrotAddress=127.0.0.1
ParrotPort=42011
Startup={Your P25 Reflector Talkgroup here}
InactivityTimeout=10
Debug=0

P25HOSTS

 sudo vi /etc/P25Hosts.txt

Determine what P25 Talkgroup you will use, and supply that in the P25Hosts.txt file in this format: TG(tab)127.0.0.1(tab)41000

P25Hosts

Save and exit. 

<STOP> TEST POINT C1

Lets test connectivity between the gateway and the reflector. You should still have the P25Reflector running in a terminal window, and it's probably reporting "No Repeaters Linked" every several seconds. We will start the P25Gateway and see if it connects to the P25Reflector:

cd /opt/P25Gateway
./P25Gateway /etc/P25Gateway.ini & 

You should see a process ID number - not an error message. Gateway Start 


Now - in the P25Reflector terminal session, you should see the connection after a few seconds ('P25GATEWAY is my 'Callsign' in the .ini)Reflector Start


"Can't get MMDVM user" error? I've heard reports that the Daemon setting in the P25Gateway file may actially need to be 0

ANALOG_BRIDGE_P25

 sudo vi /etc/Analog_Bridge_P25.ini

The Analog Bridge files only need a couple of modifications - only those lines are listed below: 

[GENERAL]
decoderFallBack = true     
useEmulator = false   

[AMBE_AUDIO]
server = 127.0.0.1
fromDMRPort = 34100 {IMPORTANT}
toDMRPort = 34103 {IMPORTANT}
ambeMode = P25 {IMPORTANT}
minTxTimeMS = 2000
gatewayDmrId = {YOUR DMR-ID+2-Digits. See MMDVM_Bridge notes}
repeaterID = {YOUR DMR-ID+2-Digits. See MMDVM_Bridge notes}
txTg = {YOUR P25 TALKGROUP from P25Hosts.txt HERE}
txTs = 1 
colorCode = 1

[USRP]
server = 127.0.0.1
toASLPort = 34001 {IMPORTANT}
fromASLPort = 32001 {IMPORTANT}
aslAudio = AUDIO_UNITY
agcGain = -20
dmrAudio = AUDIO_UNITY
dmrGain = 0.35

ANALOG_BRIDGE_DMR

 sudo vi /etc/Analog_Bridge_DMR.ini

[GENERAL]
decoderFallBack = true     
useEmulator = false   

[AMBE_AUDIO]
server = 127.0.0.1
fromDMRPort = 31100 {IMPORTANT}
toDMRPort = 31103 {IMPORTANT}
ambeMode = DMR {IMPORTANT}
minTxTimeMS = 2000
gatewayDmrId = {YOUR DMR-ID+2-Digits. See MMDVM_Bridge notes}
repeaterID = {YOUR DMR-ID+2-Digits. See MMDVM_Bridge notes}
txTg = {IMPORTANT - Brandmeister Talkgroup Number to link}
txTs = 1 
colorCode = 1

[USRP]
server = 127.0.0.1
toASLPort = 32001 {IMPORTANT - must match FROM port in P25.ini}
fromASLPort = 34001 {IMPORTANT -must match TO port in P25.ini}
aslAudio = AUDIO_UNITY
agcGain = -20
dmrAudio = AUDIO_UNITY
dmrGain = 0.35

MMDVM_BRIDGE

 sudo vi /etc/MMDVM_Bridge.ini

The MMDVM Bridge connects to the BrandMeister master server, and is essential a 'virtual' hotspot. What you configure here will appear in your BM Dashboard at brandmeister.network. A note about DMR-IDs: You do NOT need to register for a new DMR-ID for this hotspot. Simply append 2 digits to your existing ID, and BM will know what to do. Example: If my DMR-ID is 1234567, I can use anything from 123456701 through 123456799 for the MMDVM_Bridge ID, or any hotspot. 

MMDVM_BRIDGE is another large file - but only a few lines need to be tweaked from default. 

[General]
Callsign={YOUR CALL}
Id={YOUR DMR-ID+2-Digits}
Timeout=180
Duplex=0

[DMR]
Enable=1 {IMPORTANT}
ColorCode=1
EmbeddedLCOnly=1
DumpTAData=0

[P25]
Enable=1 {IMPORTANT}
NAC=927

[DMR Network]
Enable=1 {IMPORTANT}
Address=3101.repeater.net {IMPORTANT - Set your BM Master per your region!)
Port=62031
Jitter=750
Local=62032
Password=passw0rd
Slot1=1
Slot2=1
Debug=0

[P25 Network]
Enable=1 {IMPORTANT}
GatewayAddress=127.0.0.1
GatewayPort=42020
LocalPort=32010
Debug=0

<STOP> TEST POINT C2

Confirm your MMDVM_Bridge connects to Brandmeister. 

cd /opt/MMDVM_Bridge

./MMDVM_Bridge /etc/MMDVM_Bridge.ini &

After a few seconds, you should see "MMDVM_Bridge is Running", followed by a successful connection to the BM master. Log onto your Brandmeister dashboard, and have a look in "My Hotspots" for your new 'hotspot'. 

If this fails - double check the MMDVM_Bridge.ini file....

BRANDMEISTER CONFIG

Once you've verified that the MMDVM_Bridge has connected to BrandMeister - you need to configure a static talk group for your hotspot. This will push the DMR traffic from BM to your hotspot... Use the same DMR talkgroup that you chose in the ANALOG_BRIDGE_DMR.ini file.... 

PI-STAR CONFIG

Optional step for setting up a hotspot running Pi-Star to connect to your bridged Talkgroup. You'll need the IP address or FQDN that Hotspots will use to access your reflector. 

SSH into your Pi-Star via the method of your choosing, and set the filesystem to read/write:

rpi-rw

Get permissions to modify files:

sudo su

Add your reflector to the P25Hosts file

sudo vi /root/P25Hosts.txt

Enter your information in the format: {TG#}tab{ReflectorIP}tab(41000) - there are also  instructions shown in the file.

Save and Exit.

Force Pi-star to re-load the P25Host file:

sudo pistar-update

When the update completes, exit the pi-star SSH session, and pull up the Dashboard. You should see the TG and IP domain in the "P25 Startup Host" on the Pi-Star configuration screen. You can set this as your startup now or not... 


RUN THIS BEAST!

OK - so here we are... let's run everything together! First - let's start clean. Reboot your device. 

Run each of these in it's own terminal window initially - this will help with troubleshooting. 
cd /usr/local/bin/
./P25Reflector.sh start /etc/P25Reflector.ini &


(new window)
cd /opt/P25Gateway
./P25Gateway /etc/P25Gateway.ini &


(new wind0w)
cd /opt/Analog_Bridge
./Analog_Bridge_DMR /etc/Analog_Bridge_DMR.ini &


(new wind0w)
cd /opt/Analog_Bridge
./Analog_Bridge_P25 /etc/Analog_Bridge_P25.ini &


(new window)
cd /opt/MMDVM_Bridge
./MMDVM_Bridge /etc/MMDVM_Bridge.ini &


(Pro-Tip: I have written a script to launch all of these. Once you've worked out any bugs in the setup and are running without issues, grab the bridge.sh script from here and place it in /opt. You can then start everything up with ./bridge.sh &) 

A note about 

HIT IT WITH SOME P25! 

This is the final step, get a P25 radio and make sure you’ve got the frequency, NAC and talkgroup programmed correctly, and transmit.

In the terminal windows, you should see messages indicating DMR and P25 TX/RX activity. Pay particular attention to the P25Reflector and MMDVM_Bridge info - those seem to convey the most in terms of where something may be going sideways. If that happens, check, and re-check, firewall and IP addresses, DMRIDs, ports and talk groups... and check out the DVSwitch groups.io board. for support! Thanks to everyone involved in creating and maintaining these software tools! 

DSTAR Peanut is linked to XLX522

Thanks to PA7LIM http://PA7lim.nl/peanut , we are now able to use computers (wind0ws), android phones (network-radio with android)  to link with DSTAR reflectors, which are linked, e.g. XLX522

in order to link to the reflector, you need an AMBE chip (USB) and running with AMBEServer application. you could either run it on a windows or a linux machine, for me i am running on a raspberry pi 3B+ as David, PA7LIM will connect to it via its server program, hence you should see PA7LIM-D always connected to XLX522 reflector.

Analog_bridge/MMDVM_Bridge and Allstarlink

Thanks to N4IRS , Now we can utilized the allstarlink’s asterisk USRP module to link to the Analog_bridge program/MMDVM_bridge and of course, the Software AMBE Transcoding MD380-emu.

The basic diagram of the implementation is as below:-

My analog radio Yaesu FT-7900 which connected to serial to windows Echolink (9W2LWK-R) <-> connected to Raspi3 allstarlink asterisk echolink module (9W2LWK-L) , which also connected to allstarlink node 47259 which is also connected to USRP private node 1999 (which internal link via udp port) <-> Analog_Bridge (which need to transcode the audio PCM/DMR via MD380-emu program) <-> MMDVM_Bridge <-> MY BM Master (TG50210) and back forward.

The procedures / process looks very complicated, but if you follow the step from N4IRS documents (at below link), you will get through the setup steps by steps.

Google Doc for setup Analog Bridge

The document above uses Rasbian/Debian type of linux distribution, where it utilized apt-get (Repository) to install all the dependencies, if you are someone that uses Archlinux like me, you can install the dependencies by using Pacman -S xxx command instead, and then download the individual binary version of Analog_Bridge, MMDVM_Bridge here at GitHub , the /bin directory should have the Analog_Bridge.amd64 , Analog_Bridge.armhfAnalog_Bridge.i386 | MMDVM_Bridge.amd64, MMDVM_Bridge.armhfMMDVM_Bridge.i386 accordingly depending on your Linux architecture.

The most difficult part is the MD380-emu, where you need to compile from source from the github if you are not using Rasbian/Debian based linux.

It is a tedious process, what i did was (for armv7h architecture) , i apt-get install md380-emu from my pi-star (Rasbian) then i copy the binary over the the Archlinux (it works perfectly)

For those amateur stations who want to play around with your audio in DMR/C4FM/DSTAR , they can firstly try out Analog-digital on analog radio simplex gateway @ 148.825Mhz CTCSS 177.3Hz hosted by 9W2LWK if you are in USJ/Puchong/Putra Jaya/Cyber Jaya/Shah Alam Area

If you are on android app and you wanted to try out DMR/C4FM/DSTAR , you can use echolink 9W2LWK-L/9W2LWK-R , and listen to your own audio in Broadcastify or Brandmeister Hoseline , of course this is also applied on Analog_bridge , on 148.825Mhz

Looking forward to see new stations try out your audio in C4FM/DMR/DSTAR before jumping to digital devices like FT70D (C4FM) , MD380/390 (DMR), FTM100DR (C4FM, WiresX), Icom ID-51E (DSTAR), Motorola XPR 7550 (DMR) etc. (See my YouTube video on my previous post on how to use SDR to decode DMR signal/RF)